
Roof Valley Drainage, Debris, and Maintenance Explained

A roof valley is where two roof slopes meet, making it a key route for rainwater and snowmelt. It directs runoff toward the gutters, and its design must suit the surrounding roofing material. In Hudson, MA, seasonal weather makes reliable drainage details important for protecting a home.
Choosing a roof valley style involves more than appearance. The material and profile affect water flow, debris buildup, and how easily wear can be spotted. The right fit depends on the roof covering, exposure to rain or snow, and the finish you prefer.
This guide explains the differences between open and closed roof valleys, compares common flashing materials and profiles, and outlines what to consider when matching a valley to shingles or other roofing. You’ll also learn what to look for during maintenance, including debris, damaged shingles, and flashing issues, and when to seek professional attention.
Table of Contents
What Is a Roof Valley?
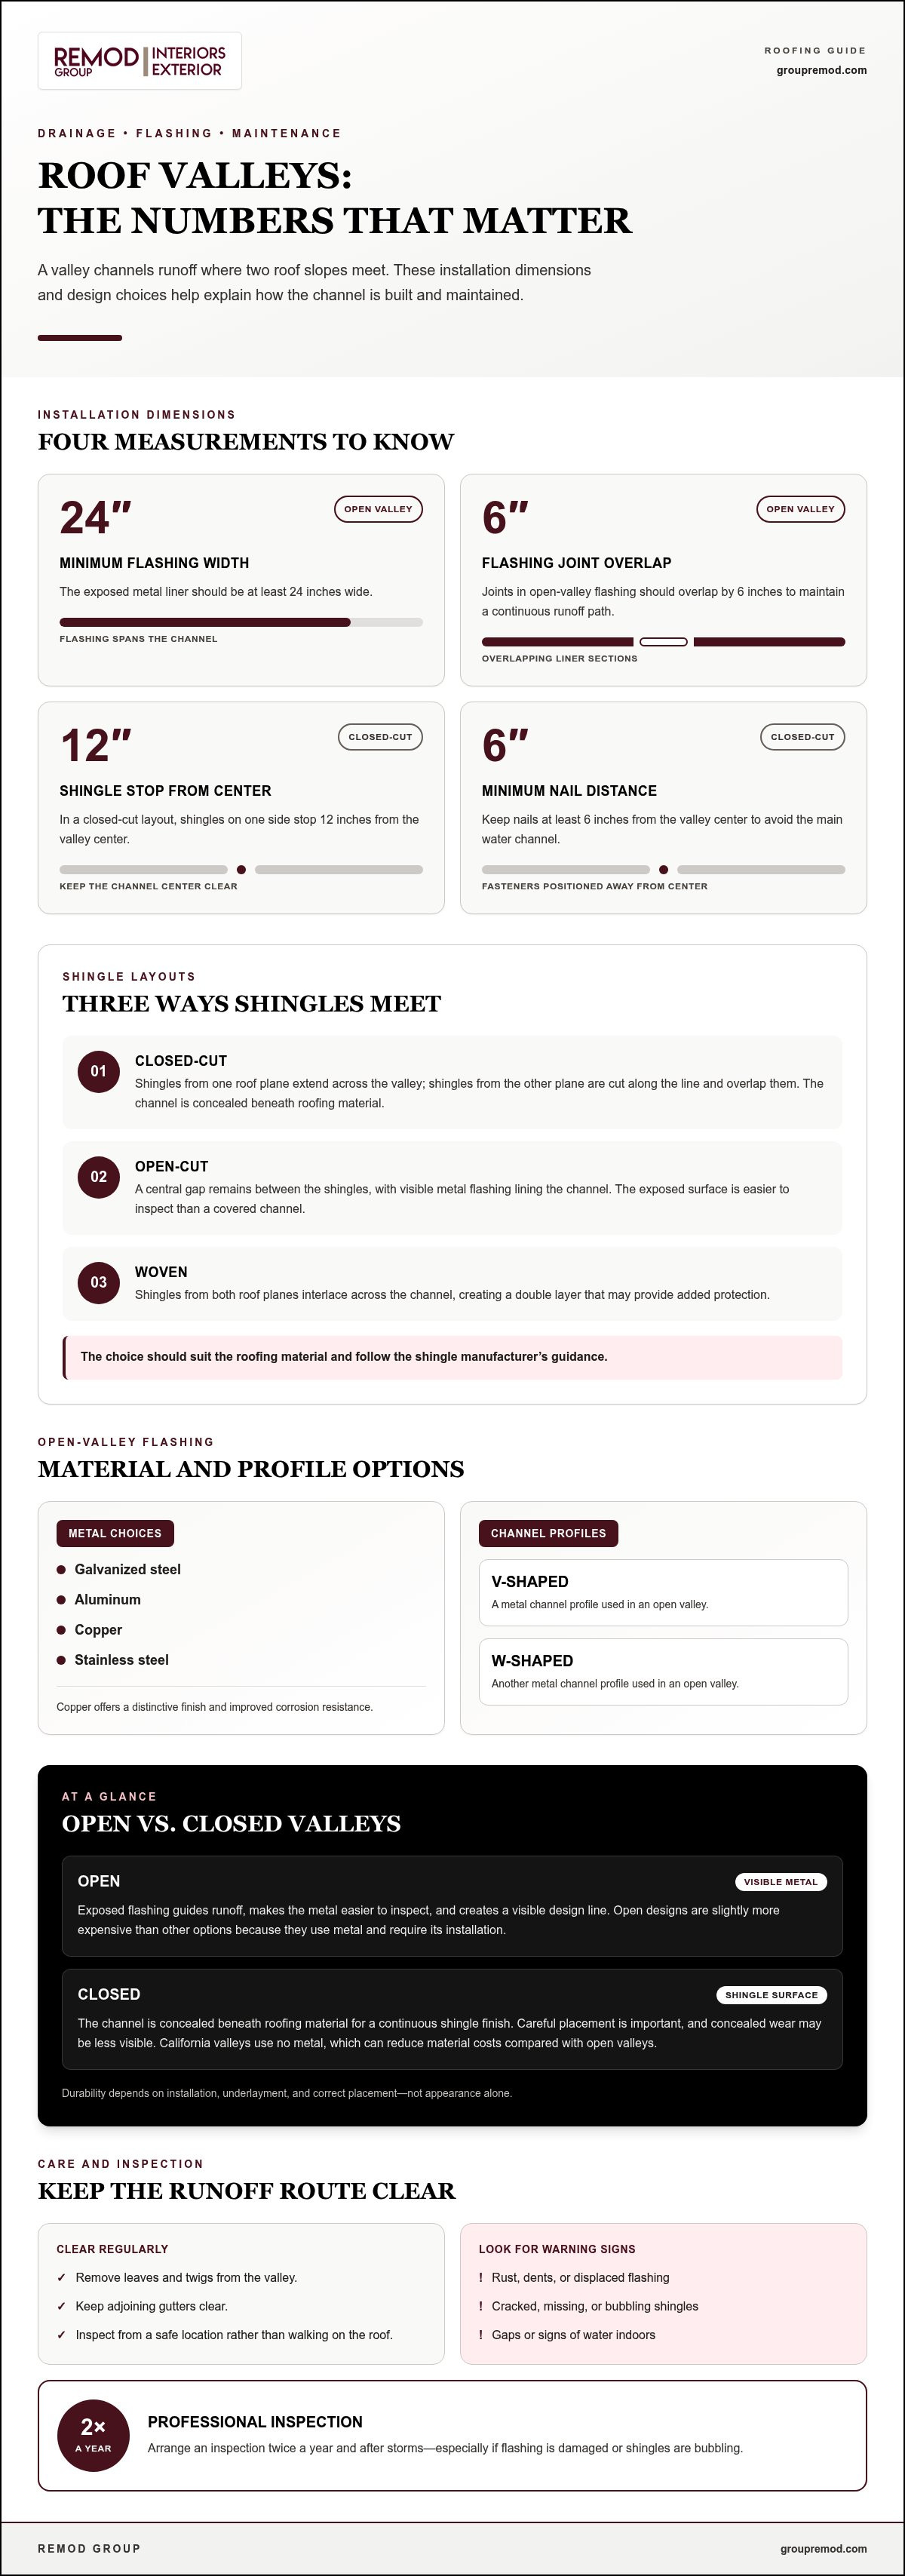
A roof valley is the junction where two sloping roof planes meet and direct runoff toward the gutters. In the United States, applicable building requirements depend on locally adopted codes and the roofing system. Underlayment, flashing, and fastening details all play a part.
Valley Shingling Methods
Closed-cut, open-cut, and woven methods describe how shingles meet at this junction. In a closed-cut layout, shingles from one roof plane extend across the valley, while shingles from the other plane are cut along the line and overlap them. An open-cut method leaves a central gap lined with visible metal flashing.
A woven method interlaces shingles from both roof planes across the channel, creating a double layer that may provide added protection. Each method gives the roof valley a different finish and changes how the roofing materials meet. The choice should follow the shingle manufacturer’s guidance.
Open and Closed Valley Installation
Open installations place a metal liner over underlayment, leaving the flashing exposed between shingles. The metal can form a V-shaped or W-shaped channel, and joints in open-valley flashing should overlap by 6 inches. This overlap helps maintain a continuous path for runoff down the slope.
For a closed valley, underlayment goes down before shingles overlap at the roof planes. In a closed-cut layout, shingles on one side stop 12 inches from the center, and nails stay at least 6 inches from it. Correct placement helps keep fasteners away from the main water channel.
Comparing Open and Closed Valleys
An open design exposes metal between the shingles, while a closed design conceals the channel beneath roofing material. The visible liner in an open valley makes its metal surface easier to inspect. A closed finish depends on careful shingle placement, with cuts and overlaps aligned precisely.
Durability depends on the installation, not appearance alone. Closed valleys can help protect the roof when underlayment and shingles are fitted correctly, while gaps or misplaced fasteners can create paths for water. The roof valley method should suit the roof covering and follow the manufacturer’s instructions.
Closed Valley Appearance and Cost
A closed valley provides a continuous shingle surface without an exposed metal strip, creating a less prominent line across the roof. An open design makes flashing part of the visible finish. Copper, for example, can create a distinctive metal accent.
Material choice can affect project cost. California valleys use no metal, which can reduce material costs compared with open valleys. Closed designs still require precise shingle work, and concealed wear may be less visible. Consider appearance, roofing materials, and repair access together when choosing a roof valley finish.
Open valley drainage and debris handling
In an open design, two roof planes meet beside a visible metal channel. Its clear drainage path helps carry heavy runoff toward the gutters.
Construction and Exposed Metal Flashing
An open valley uses a metal liner over underlayment, with a strip of flashing visible between the roofing materials. The channel can be V-shaped or W-shaped, and the flashing should be at least 24 inches wide.
The exposed surface directs water down the slope and is easier to inspect than a shingle-covered channel. A roofer must fit the liner carefully, overlapping its joints so water flows toward the gutters rather than beneath the shingles. Flashing may be galvanized steel, aluminum, copper, or stainless steel.
Open channels handle more runoff than almost any other roof area. During rain or snowmelt, water from both roof planes converges there, so an unobstructed path is essential. If leaves or twigs collect in the channel, water can slow, pool, and press against nearby shingle edges.
Debris is less likely to collect in an open valley than in a shingle-covered one, but homeowners should still clear leaves and twigs regularly. Keep the adjoining gutters clear, too. A blocked outlet can disrupt drainage even when the metal channel looks clean.
Visible metal also makes some problems easier to spot. Rust, dents, or displaced flashing can indicate damage that affects water flow. Cracked or missing shingles along either edge need attention as well, since they can expose the roof beneath the channel.
Cost and Appearance
An open valley creates a defined metal line against the surrounding shingles, making the flashing part of the roof’s visible design. Copper offers a distinctive finish and improved corrosion resistance; galvanized steel and aluminum are other common choices.
Open designs are slightly more expensive than other options because they use metal and require its installation. The material and visible profile shape the final appearance, while precise fitting supports drainage and durability. The right choice balances the roof’s look with the channel’s ability to handle runoff.
For maintenance, inspect the channel from a safe location rather than walking on the roof. Look for debris, rust, dents, or shingles that appear cracked or missing. After a storm, these signs can show whether the drainage route needs professional attention.
Clear gutters help the channel drain efficiently, since water needs an open path beyond the roof edge. If you're planning broader exterior updates, explore siding and window improvements as part of the home’s overall exterior.
Valley flashing materials and profiles
Flashing materials and profiles affect water flow, the roof’s appearance, and what maintenance can reveal. Underlayment beneath the channel adds protection if water passes the shingles or flashing.
Underlayment Materials
Self-adhering ice and water shield is recommended beneath valley flashing because it protects the roof deck without nails or fasteners. Placement matters: the membrane creates a water-resistant layer under the exposed liner or shingles, supporting drainage if the upper roofing surface is compromised.
According to IKO, successive pieces of ice and water protector membrane should overlap by at least 6 inches. That overlap helps maintain coverage at membrane joints, where water could otherwise reach the roof deck.
Flashing Overlaps and Fastening
Flashing overlaps create a continuous path that directs water down the valley rather than beneath the metal. Installers should orient each joint to shed water toward the eaves, then follow the roofing system’s specified fastening method.
According to IKO, a minimum 28-gauge pre-finished galvanized metal, or similar non-standing material, is recommended for valley flashing. IKO also recommends a 6-inch overlap between successive ice and water protector membrane pieces. These details help preserve coverage at seams while limiting unnecessary openings through the underlayment.
Common open-valley flashing materials include galvanized steel, aluminum, copper, and stainless steel. Each creates a different look. Copper can improve corrosion resistance, while a W-shaped liner helps prevent water crossing the channel from being pushed beneath shingle edges. A V-shaped liner creates a simpler channel profile.
IKO recommends valley flashing between 26 and 28 gauge. The selected material and gauge affect the liner’s fit, rigidity, and exposure to corrosion. A roofer also weighs the roofing material, valley design, and local weather exposure when choosing a suitable method. Proper fit matters more than appearance alone because water must remain directed into the channel.
Rust, dents, or displaced flashing can signal that water may be seeping through. Cracked or missing nearby shingles can expose vulnerable areas, too. A roofing professional can assess whether shingles need repair, flashing needs replacement, or underlying layers need attention. For residential properties in areas like Huntsville, Thoughtful Roofer Inc. provides experienced repair services to address damaged flashing and leak vulnerabilities. Addressing visible damage helps protect the roof deck from continued moisture.
Repair or replacement price depends on the material, damage extent, roof access, and whether adjacent roofing needs work; the price is provided after a quote request. Compare those factors alongside lifespan and appearance, since choosing a different metal or profile can change the repair scope.
Inspecting and maintaining roof valleys
Professional inspections twice a year and after storms can identify wear before water reaches the roof deck. A clear channel, intact shingles, and sound flashing all contribute to effective drainage.
Roof Valley Inspection
A professional inspection checks the channel, adjacent shingles, flashing, and interior signs of water entry. This matters because a small opening at a roof valley can let moisture beneath the roofing, where damage may develop out of sight.
Look for rusted or exposed metal, bubbling shingles, and gaps between the shingles and the valley. Missing or cracked shingles can create another route for water. Check galvanized flashing for rust, dents, or visible separation.
Interior clues can help locate a leak. Water stains or damp patches on ceilings or walls near a valley may indicate water entry, while dripping during heavy rain is a clear warning. Note where the mark appears and whether it followed a storm. This context can help a roofing professional trace the source.
Check for debris during each inspection. Leaves and twigs can obstruct drainage and contribute to pooling. An open roof valley exposes the flashing, making debris and metal damage easier to spot. A closed design covers the channel with shingles, so focus on shingle edges and signs of moisture indoors.
Look for cracked, missing, or bubbling shingles near the channel.
Check visible flashing for rust, dents, or separation.
Note ceiling stains, damp wall patches, or dripping during heavy rain.
Roof Valley Maintenance
Regular maintenance keeps the channel clear and helps water flow toward the gutters. Remove leaves and twigs from the drainage path, and keep the gutters clean so runoff can leave the roof without backing up.
After a storm, check from a safe vantage point for new debris or displaced shingles. A clean surface doesn’t confirm that hidden layers are intact. Bubbling shingles or indoor dampness can point to trouble beneath the visible covering.
Arrange professional inspections twice a year and after storms, especially if you notice rusting flashing, missing shingles, or water indoors. Experienced contractors such as Pro Torch Roofing can assess whether the valley installation needs repair and whether the problem extends beyond the visible surface.
Timely repairs can limit continued moisture exposure and help preserve the roof. For example, a cracked shingle beside the channel and a damp ceiling patch call for more than debris removal. An inspection should trace the water path, assess nearby materials, and identify the source before repairs begin. Regular attention helps keep the roof valley functioning as intended.
Choosing a valley type based on roofing materials
Match the valley method to the roofing material, manufacturer guidance, and expected weather exposure. For asphalt shingles, closed-cut, woven, and open designs offer different combinations of appearance, drainage, and inspection access.
Closed-cut valleys work with most shingle types and roof designs, making them a versatile choice when you prefer a continuous shingle finish. Shingles cover the channel, so precise cuts and placement matter. Check the shingle manufacturer’s recommended valley method before choosing this layout. The product guidance helps determine how the material should meet at the roof intersection.
Open valleys separate the shingles along the center and expose a metal liner. The visible channel provides a direct drainage route and makes the flashing easier to inspect. Open designs suit roofs in areas with heavy rainfall or snow, where a concentrated flow path matters. The metal’s color and profile also contribute to the roof’s appearance.
For a shingle finish across the intersection: consider a closed-cut method, which is compatible with most shingle types and roof designs.
For visible metal and an inspectable channel: consider an open valley, especially where heavy rainfall or snow shapes the drainage needs.
For an interwoven shingle surface: a woven valley uses shingles from both sides and creates a double layer that may provide added protection.
For appearance in moderate conditions: a California valley uses no metal and is described as suited to homes where appearance matters, with less risk of heavy rain or snow accumulation.
Where roof planes have different coverings, the valley method must accommodate both materials at their meeting point. Start with the shingle manufacturer’s instructions, then consider exposure to rain and snow, the desired finish, and how readily the detail can be inspected. The choice affects more than appearance: a compatible layout supports drainage and long-term roof performance.
Longevity also depends on the material beneath the visible surface. Ice and water shield underlayment is recommended for valleys, while open-valley flashing can use galvanized steel, aluminum, copper, or stainless steel. These options differ in appearance and corrosion resistance, so let the roof’s design and exposure guide material selection.
For a material-conscious assessment of your roof, explore Remod Group’s roofing services and discuss how the valley design fits the roofing system.
Remod Group: Deck Construction
Remod Group is a natural next step when your plans extend beyond roof maintenance to improving how you use your home. Its Deck Construction service can help create an outdoor area around your household’s needs, while Siding Installation can refresh and protect your home’s exterior.
Consider Deck Construction when planning a more functional outdoor living space, or Siding Installation when exterior cladding is part of a broader renovation. Remod Group also offers Kitchen Remodeling and Bathroom Remodeling for homeowners coordinating interior improvements. Each project is a distinct decision, so choose the work that fits your home and priorities.
For a home improvement project, contact Remod Group or visit groupremod.com.
Plan the Next Step for Your Home
A roof decision can shape more than one part of your home improvement plan. If you’re considering work around a roof valley, think about how the project fits your priorities, timing, and the condition of the surrounding exterior. A clear plan makes it easier to decide what deserves attention first and which improvements can be coordinated.
Remod Group offers Roofing Services for homeowners planning roof work in Hudson, Natick, Sudbury, Waltham, Ashland, and nearby communities. If your project also includes other parts of the home, the company offers Deck Construction, Kitchen Remodeling, and Siding Installation. Each can be a separate or coordinated improvement, depending on your goals.
When you’re ready to discuss your roof, contact Remod Group about your roof. Start with the questions you want answered and the outcome you have in mind. A thoughtful conversation can help you move from observations to a practical project plan, with the next step guided by your home’s needs.
Frequently Asked Questions
What is a roof valley and how does it work?
A roof valley is the junction where two sloping roof sections meet and concentrate runoff. It guides water downhill toward the eaves, where gutters carry it away from the home. Think of two roof planes feeding one channel: rain from both sides converges there. That concentrated flow is why the surrounding shingles, underlayment, and drainage outlet need to work together.
What are the different types of roof valleys?
The main roof valley types are open, closed-cut, woven, and California. An open design exposes a metal liner; closed-cut and woven designs use shingles across the junction in different patterns. A California valley uses shingles laid across the channel, with another course placed vertically along its edge. For a practical choice, compare the roof covering with the shingle manufacturer’s recommended valley method.
What materials are used for roof valley flashing?
Common flashing materials include galvanized steel, aluminum, copper, and stainless steel. The choice affects the visible finish and resistance to corrosion. Copper, for example, can improve corrosion resistance, while galvanized steel provides a finished metal surface suited to many roof designs. Consider the material alongside the roofing system and channel profile, rather than choosing flashing by color alone.
How do you install roof valley flashing step by step?
Valley flashing is a professional roofing installation, not a safe do-it-yourself task. A typical open-valley sequence includes preparing the underlayment, setting the metal liner, and fitting shingles along its edges.
Install self-adhering ice and water protection beneath the valley.
Overlap successive membrane pieces by at least 6 inches, as IKO recommends.
Fit the flashing and lay out the shingle edges; IKO advises a 3-inch band of asphalt plastic cement beneath each valley shingle.
What is the best roofing method for a roof valley: open or closed?
There isn’t one best method for every roof. The roofing material, manufacturer’s installation guidance, weather exposure, and preferred appearance all matter. Open valleys suit roofs exposed to heavy rain or snow and leave the metal channel visible for inspection. Closed-cut valleys work with most shingle types and roof designs. Compare these factors before choosing rather than treating appearance as the only deciding point.
What are common signs of roof valley leaks or damage?
Watch for rusted or exposed flashing, dents in metal, and nearby shingles that are cracked, missing, or bubbling. Indoors, water stains or damp patches on ceilings or walls near the junction can point to water entry. Dripping during heavy rain is another warning. A new ceiling mark beneath a valley after a storm merits attention, even if the roof surface looks intact from the ground.
How often should roof valleys be inspected and maintained?
Arrange professional inspections twice a year and after storms. Between inspections, keep leaves and twigs out of the channel, and keep gutters clear so runoff can drain away. From a safe vantage point, look for loose debris, displaced shingles, or visible metal damage. If you notice a ceiling stain or dripping, don’t wait for the next scheduled inspection.
What are the risks of improper roof valley installation?
Poorly fitted shingles, flashing, or underlayment can let water seep below the roof covering. Runoff may then reach the roof deck, contribute to leaks, and damage nearby building materials. Incorrectly placed fasteners or gaps can also disrupt the water path. Because the junction gathers flow from both slopes, a defect there can affect more than the immediate seam.


Comments